We live in a hyper-visual world, where imagery dictates your rating. The increasing need to have a positive impact on sales especially high in a vast and competitive design world.
That is why print design is becoming an increasingly utilised tool in any designer’s tool kit, be it swimwear, stationery, fashion, brand or home wears designer. Print designs, surface design, patterns they called different but carry same purpose, is to capture people’s interests in instant, unifies the design collection and creates point of difference from other brands.
For example Tigerlily always been known for they boho and travel inspired prints and easily recognised in Australian fashion market.

Say, We Are Handsome and beautiful swimwear with stunning photographic print design are evoked.

But what if to take print and fabric a bit further? Doesn’t this collaboration open more door? There are so many ideas and product that can be created with using fabric as a base medium. Don’t think of a fabric as a cloth on a roll.
Would be a wedding invention a luxurious idea to make your invitees fill extra special and setting the tone of your weeding?

Fabric packing is very unique concept too, wrap your product, or even how about envelops or business cards?

To archive all the above ideas is a breeze now days. We live in the new era of digital printing technologies. Fast, cost efficient, ecofriendly they opens doors to the craziest creative projects!
That is why we are in love with digital fabric printing!
Save
Garment making and production can be daunting and a complicated process especially placement or engineered printing. A lot of time and effort goes into research and understanding where to start. We have put together tutorials on how to design, work with and prepare legging pattern for digital placement fabric printing. For this tutorial you need to be proficient in Illustrator or at least have basic knowlage. Our tutorial is based on industry standards. This technic can be applied to printing other products such as bikinis, t-shirts, singlets , dresses etc.
How to prepare a layout/mark up legging pattern for fabric printing in Photoshop
Once you’ve completed the steps in the tutorial ‘How to use legging pattern in Photoshop’ You may want to print more than 1 design or more than 1 size, the most economic way to do this is to create a mark up/placement layout to have printed.
The following are instructions on how to set up in Photoshop, but could easily be done in Illustrator.
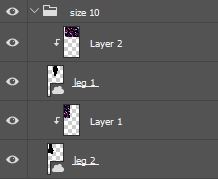
Start off by renaming the pattern layers to insure that you always have a pair of leggings.
If you are only wanting the same size with different designs you can just Duplicate the leg layers. If you’d like to bring in different sizes you will need to repeat the steps in ‘How to use legging pattern in Photoshop’
In this tutorial we will be using the same size 10 but printing in new designs.
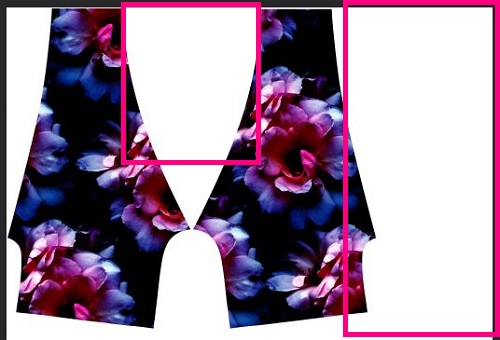
On the same artboard move files to the left hand side. you will notice that you can only comfortable fit 1 pair within the 147cm width with the current orientation; however there is a lot of wastage as illustrator below.
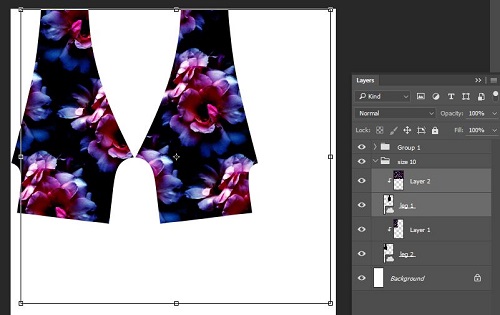
Like a Jigsaw puzzle you will now need to start moving the patterns, you will need to make sure that you keep in mind that your grain line is parallel to the selvage. To do this, select the leg you’d like to rotate (select both layers) press Ctrl+t to open up the transform tool and while holding down shift rotate the image 360′ and make sure to move the pattern piece as close as possible to other leg (zoom in to make sure it is not overlapping)
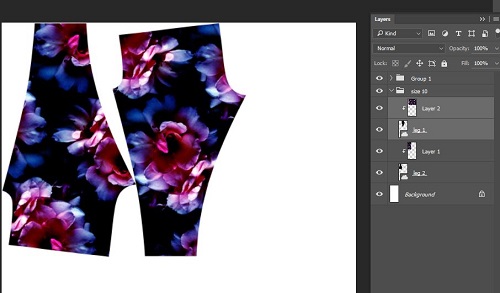
You can now start bringing in the other size 10 designs and play around with the layout. It’s best that you make the art board slightly longer than needed and once you’ve set up all the designs crop the excess.
Make sure you zoom in and double check that you haven’t overlapped any areas, when you are happy with the layout save as a JPG, TIFF or PDF.

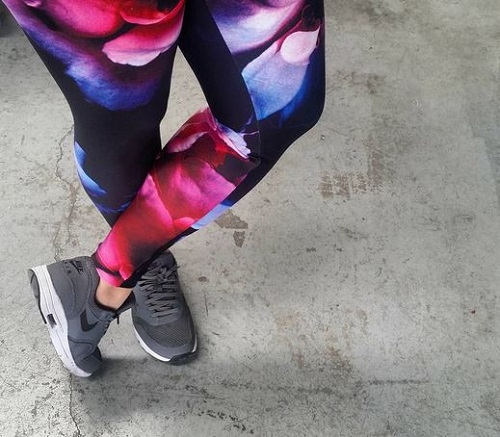
You’re now on your way to have custom printed fabric which you will be able to make into comfy leggings.

Save
Save
We live in a hyper-visual world, where imagery dictates your rating. The increasing need to have a positive impact on sales especially high in a vast and competitive design world.
That is why print design is becoming an increasingly utilised tool in any designer’s tool kit, be it swimwear, stationery, fashion, brand or home wears designer. Print designs, surface design, patterns they called different but carry same purpose, is to capture people’s interests in instant, unifies the design collection and creates point of difference from other brands.
For example Tigerlily always been known for they boho and travel inspired prints and easily recognised in Australian fashion market.
Say, We Are Handsome and beautiful swimwear with stunning photographic print design are evoked.
But what if to take print and fabric a bit further? Doesn’t this collaboration open more door? There are so many ideas and product that can be created with using fabric as a base medium. Don’t think of a fabric as a cloth on a roll.
Would be a wedding invention a luxurious idea to make your invitees fill extra special and setting the tone of your weeding?
Fabric packing is very unique concept too, wrap your product, or even how about envelops or business cards?
To archive all the above ideas is a breeze now days. We live in the new era of digital printing technologies. Fast, cost efficient, ecofriendly they opens doors to the craziest creative projects!
That is why we are in love with digital fabric printing!
Save
Garment making and production can be daunting and a complicated process especially placement or engineered printing. A lot of time and effort goes into research and understanding where to start. We have put together tutorials on how to design, work with and prepare legging pattern for digital placement fabric printing. For this tutorial you need to be proficient in Photoshop and Illustrator or at least have basic knowlage. Our tutorial is based on industry standards. This technic can be applied to printing other products such as bikinis, t-shirts, singlets , dresses etc.
How to prepare legging pattern for fabric printing in Photoshop
Open the PDF file in Illustrator. You can purchase our digital leggings pattern on our website or use your own.
Copy and paste the size you would like to use within the same file, we have selected size 10.

Delete all details and notches within the pattern piece and select the pattern shape and fill in black.
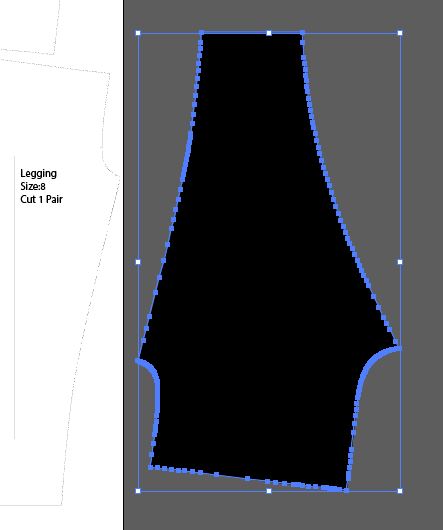
while legging is selected copy and take note on the sizing.
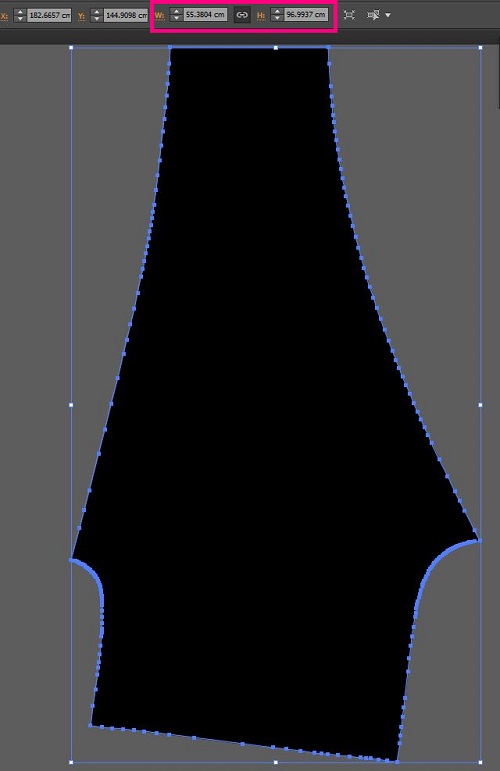
Open Photoshop and select a new artboard, keep the pixels and resolution the same, just make sure you’ve selected RGB color mode. Click OK and Paste pattern piece as a smart object, click enter to place.
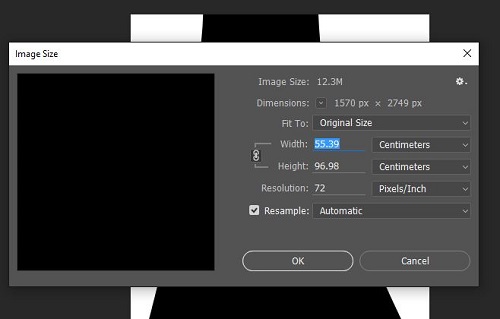
Double check that the sizing is correct by selecting Image>image size, in this case it is only a few points off which will be fine.
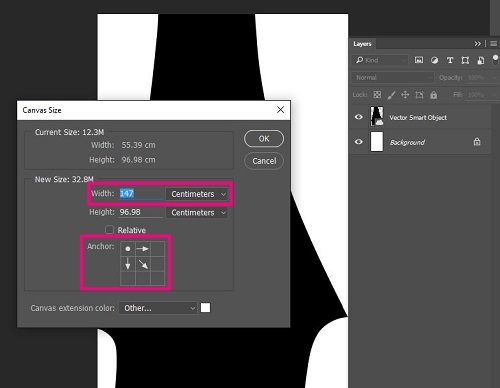
Next you’ll need to increase your artboard size to fit the other leg, change the width of your artboard to the width of the fabric you’d like to use and select the anchor points to extend from corner.
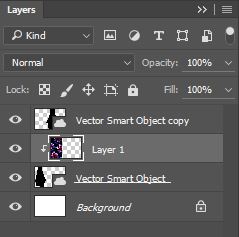
Copy Layer and while selected transform (Ctrl+t), while still selected right click on top of the layer and select Flip Horizontally, you know have a pair.
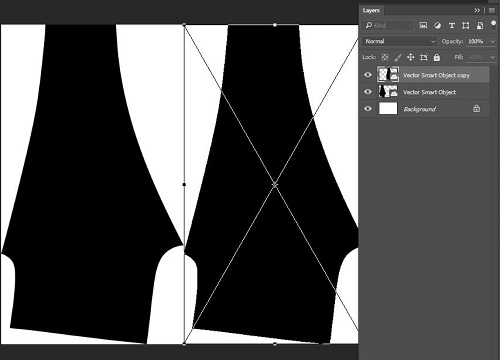
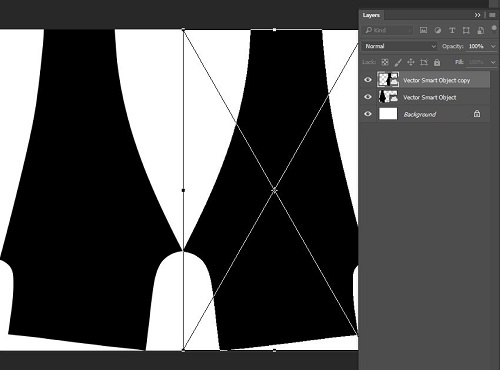
With both layers selected you will need to select transform again (ctrl+t) and while select cover over to rotate, when rotating make sure you hold down shift to make sure it rotates correctly.
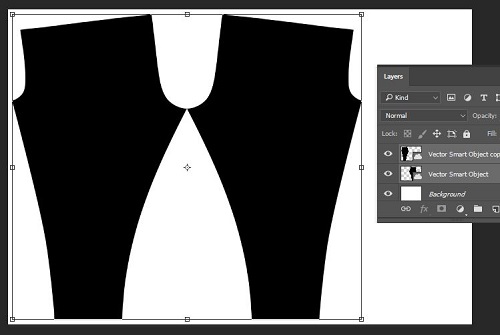
Copy and paste the design you would like on your leggings and place layer on top of the one of the pattern legs.
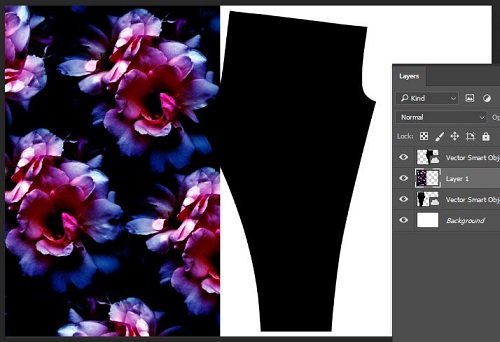
Right click on the design layer and in the drop down menu select create clipping mask.
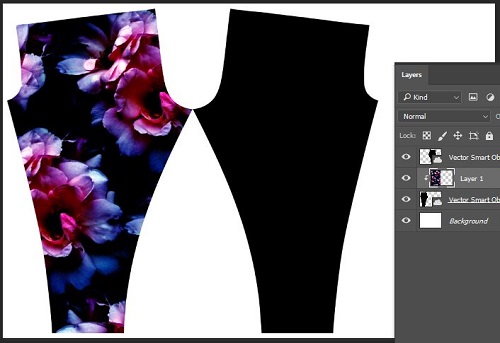
Repeat for other leg
Group all layers and centre.
Your file is now ready to print!
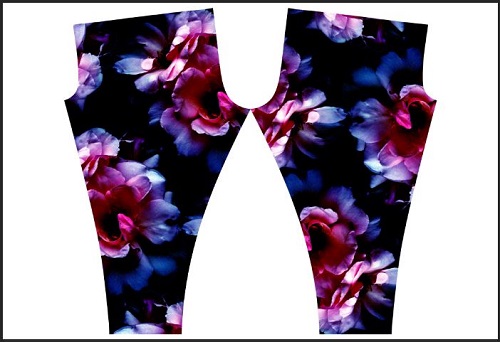
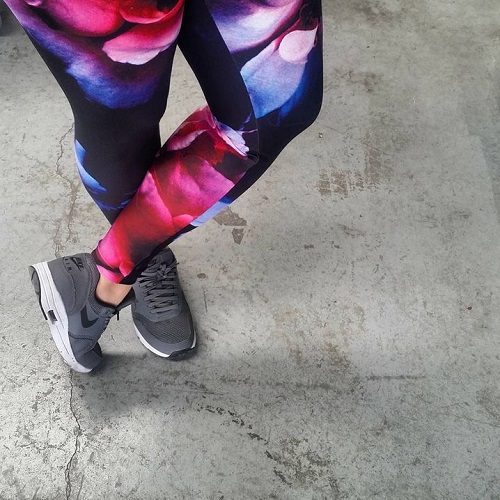
Soon you’ll have your printed fabric which you’ll be able to whip up into these comfy leggings
Save
Garment making and production can be daunting and a complicated process especially placement or engineered printing. A lot of time and effort goes into research and understanding where to start. We have put together tutorials on how to design, work with and prepare legging pattern for digital placement fabric printing. For this tutorial you need to be proficient in Illustrator or at least have basic knowlage. Our tutorial is based on industry standards. This technic can be applied to printing other products such as bikinis, t-shirts, singlets , dresses etc.
How to prepare a layout/mark up legging pattern for fabric printing in Photoshop
Once you’ve completed the steps in the tutorial ‘How to use legging pattern in Photoshop’ You may want to print more than 1 design or more than 1 size, the most economic way to do this is to create a mark up/placement layout to have printed.
The following are instructions on how to set up in Photoshop, but could easily be done in Illustrator.
Start off by renaming the pattern layers to insure that you always have a pair of leggings.
If you are only wanting the same size with different designs you can just Duplicate the leg layers. If you’d like to bring in different sizes you will need to repeat the steps in ‘How to use legging pattern in Photoshop’
In this tutorial we will be using the same size 10 but printing in new designs.
On the same artboard move files to the left hand side. you will notice that you can only comfortable fit 1 pair within the 147cm width with the current orientation; however there is a lot of wastage as illustrator below.
Like a Jigsaw puzzle you will now need to start moving the patterns, you will need to make sure that you keep in mind that your grain line is parallel to the selvage. To do this, select the leg you’d like to rotate (select both layers) press Ctrl+t to open up the transform tool and while holding down shift rotate the image 360′ and make sure to move the pattern piece as close as possible to other leg (zoom in to make sure it is not overlapping)
You can now start bringing in the other size 10 designs and play around with the layout. It’s best that you make the art board slightly longer than needed and once you’ve set up all the designs crop the excess.
Make sure you zoom in and double check that you haven’t overlapped any areas, when you are happy with the layout save as a JPG, TIFF or PDF.
You’re now on your way to have custom printed fabric which you will be able to make into comfy leggings.
Save
Save
Garment making and production can be daunting and a complicated process especially placement or engineered printing. A lot of time and effort goes into research and understanding where to start. We have put together tutorials on how to design, work with and prepare legging pattern for digital placement fabric printing. For this tutorial you need to be proficient in Photoshop and Illustrator or at least have basic knowlage. Our tutorial is based on industry standards. This technic can be applied to printing other products such as bikinis, t-shirts, singlets , dresses etc.
How to prepare legging pattern for fabric printing in Photoshop
Open the PDF file in Illustrator. You can purchase our digital leggings pattern on our website or use your own.
Copy and paste the size you would like to use within the same file, we have selected size 10.
Delete all details and notches within the pattern piece and select the pattern shape and fill in black.
while legging is selected copy and take note on the sizing.
Open Photoshop and select a new artboard, keep the pixels and resolution the same, just make sure you’ve selected RGB color mode. Click OK and Paste pattern piece as a smart object, click enter to place.
Double check that the sizing is correct by selecting Image>image size, in this case it is only a few points off which will be fine.
Next you’ll need to increase your artboard size to fit the other leg, change the width of your artboard to the width of the fabric you’d like to use and select the anchor points to extend from corner.
Copy Layer and while selected transform (Ctrl+t), while still selected right click on top of the layer and select Flip Horizontally, you know have a pair.
With both layers selected you will need to select transform again (ctrl+t) and while select cover over to rotate, when rotating make sure you hold down shift to make sure it rotates correctly.
Copy and paste the design you would like on your leggings and place layer on top of the one of the pattern legs.
Right click on the design layer and in the drop down menu select create clipping mask.
Repeat for other leg
Group all layers and centre.
Your file is now ready to print!
Soon you’ll have your printed fabric which you’ll be able to whip up into these comfy leggings
Save

Pinterest is such an inspiring platform and allows us to get so many great ideas for home decor, recipes, DIY and travel. One of the interior design trends that we’re loving is the bohemian design trend. It feels personal, cozy and vintage with worldly influences. With these easy 3 home decor trends you can add a bohemian feel to any small room instantly!
Bohemian Design Tip 1: Colorful Pillows
Pillows are a great way to add more color to a room and make it extra cozy. Vary the colors and prints to add more dimension. And if you really want to add a personal touch, make your own cushion or pillow. Print your design, photograph or artwork and create a stylish statement to lighten up any room or make a perfect gift.
Bohemian Design Tip 2: Textiles
Give new life to an old couch by layering textiles on them. See our selection of fabrics (also suitable for home decor) in our fabric shop. Contrast it with an eye-catching carpet.

Photo credit: Jungalow
Bohemian Design Tip 2: Add plants
Not only are plants great to purify the air, they’re excellent to add more life to your room. And in a bohemian interior, plants are a must.
Get more bohemian decor inspiration below!

Photo credit: Design Sponge

Photo credit: Pinterest

Photo credit: Pinterest

Photo credit: Instagram

Photo credit: Design Meet Style

Photo credit: Homedit.com

Photo credit: BHG.com
Get more Pinspired on our Digital Fabrics pillows board
Save

Elba from Live Colorful created another colorful & creative DIY tutorial: a DIY Bean Bag. For this she used the Cheery fabric she designed and which is available in our fabric shop. Did you know that printing fabrics with us is super easy? Create your design, Upload and pay, Receive your fabric!
From DIY clothes to DIY Home Decor, our mission at Digital Fabrics is to help you to bring your creativity and your amazing ideas to life!
Elba got the inspiration for her DIY project from Pinterest, but added some fun curves to make it look more organic.
MATERIALS NEEDED:
- 2 meters of heavyweight fabric. Waratah drill (147 cm wide). Design: Cheery.
- 2 packs of bean bag chair refill (100 Liter refill bags)
- Sewing machine
- Thread
- Scissors
- Pins

Pinterest is such an inspiring platform and allows us to get so many great ideas for home decor, recipes, DIY and travel. One of the interior design trends that we’re loving is the bohemian design trend. It feels personal, cozy and vintage with worldly influences. With these easy 3 home decor trends you can add a bohemian feel to any small room instantly!
Bohemian Design Tip 1: Colorful Pillows
Pillows are a great way to add more color to a room and make it extra cozy. Vary the colors and prints to add more dimension. And if you really want to add a personal touch, make your own cushion or pillow. Print your design, photograph or artwork and create a stylish statement to lighten up any room or make a perfect gift.
Bohemian Design Tip 2: Textiles
Give new life to an old couch by layering textiles on them. See our selection of fabrics (also suitable for home decor) in our fabric shop. Contrast it with an eye-catching carpet.
Photo credit: Jungalow
Bohemian Design Tip 2: Add plants
Not only are plants great to purify the air, they’re excellent to add more life to your room. And in a bohemian interior, plants are a must.
Get more bohemian decor inspiration below!
Photo credit: Design Sponge
Photo credit: Pinterest
Photo credit: Pinterest
Photo credit: Instagram
Photo credit: Design Meet Style
Photo credit: Homedit.com
Photo credit: BHG.com
Get more Pinspired on our Digital Fabrics pillows board
Save
Elba from Live Colorful created another colorful & creative DIY tutorial: a DIY Bean Bag. For this she used the Cheery fabric she designed and which is available in our fabric shop. Did you know that printing fabrics with us is super easy? Create your design, Upload and pay, Receive your fabric!
From DIY clothes to DIY Home Decor, our mission at Digital Fabrics is to help you to bring your creativity and your amazing ideas to life!
Elba got the inspiration for her DIY project from Pinterest, but added some fun curves to make it look more organic.
MATERIALS NEEDED:
- 2 meters of heavyweight fabric. Waratah drill (147 cm wide). Design: Cheery.
- 2 packs of bean bag chair refill (100 Liter refill bags)
- Sewing machine
- Thread
- Scissors
- Pins


