Tag Archives: fabric printing

How to prepare a layout legging pattern for fabric printing in Photoshop

Garment making and production can be daunting and a complicated process especially placement or engineered printing. A lot of time and effort goes into research and understanding where to start. We have put together tutorials on how to design, work with and prepare legging pattern for digital placement fabric printing. For this tutorial  you need to be proficient in Illustrator or at least have basic knowlage. Our tutorial is based on industry standards. This technic can be applied to printing other products such as bikinis, t-shirts, singlets , dresses etc.

How to prepare a layout/mark up legging pattern for fabric printing in Photoshop

Once you’ve completed the steps in the tutorial ‘How to use legging pattern in Photoshop’ You may want to print more than 1 design or more than 1 size, the most economic way to do this is to create a mark up/placement layout to have printed.

The following are instructions on how to set up in Photoshop, but could easily be done in Illustrator.

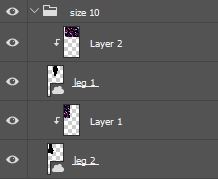
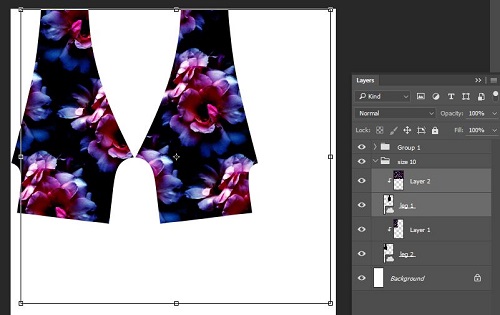
Start off by renaming the pattern layers to insure that you always have a pair of leggings.

layer_photoshop_markup_design_fabric_legging_printing

If you are only wanting the same size with different designs you can just Duplicate the leg layers. If you’d like to bring in different sizes you will need to repeat the steps in ‘How to use legging pattern in Photoshop’

In this tutorial we will be using the same size 10 but printing in new designs.

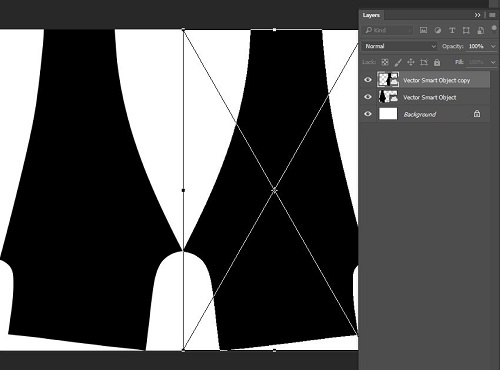
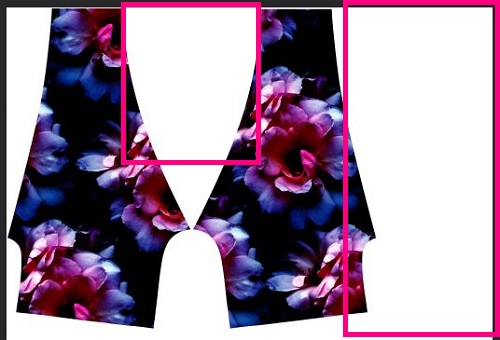
On the same artboard move files to the left hand side. you will notice that you can only comfortable fit 1 pair within the 147cm width with the current orientation; however there is a lot of wastage as illustrator below.

legging_layout_printing_fabric_design

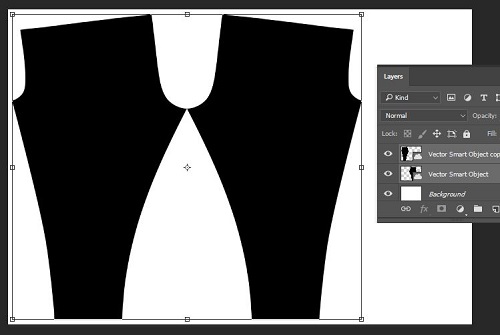
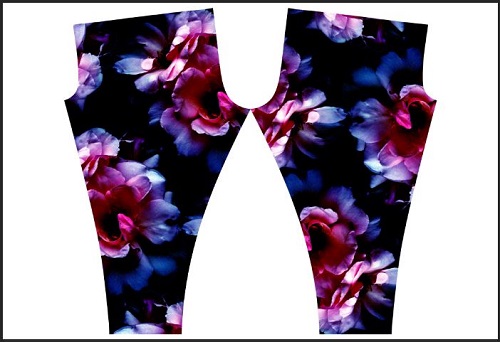
Like a Jigsaw puzzle you will now need to start moving the patterns, you will need to make sure that you keep in mind that your grain line is parallel to the selvage. To do this, select the leg you’d like to rotate (select both layers) press Ctrl+t to open up the transform tool and while holding down shift rotate the image 360′ and make sure to move the pattern piece as close as possible to other leg (zoom in to make sure it is not overlapping)

tutorial_layout_markup_printing

markup_fashion_layout_tutorial_leggings_bold_rose

You can now start bringing in the other size 10 designs and play around with the layout. It’s best that you make the art board slightly longer than needed and once you’ve set up all the designs crop the excess.

Make sure you zoom in and double check that you haven’t overlapped any areas, when you are happy with the layout save as a JPG, TIFF or PDF.

layout_legging_tutorial_polish_abstract_orchid_black_white_bold_rose_floral_sports_luxe

You’re now on your way to have custom printed fabric which you will be able to make into comfy leggings.
design-your-own-leggings-digital-fabrics-class create-your-own-activewear-design-leggings-digital-fabrics-classes

Save

Save

Design your own leggings – How to prepare legging pattern for fabric printing in Photoshop

Garment making and production can be daunting and a complicated process especially placement or engineered printing. A lot of time and effort goes into research and understanding where to start. We have put together tutorials on how to design, work with and prepare legging pattern for digital placement fabric printing. For this tutorial  you need to be proficient in Photoshop and Illustrator or at least have basic knowlage. Our tutorial is based on industry standards. This technic can be applied to printing other products such as bikinis, t-shirts, singlets , dresses etc.

How to prepare legging pattern for fabric printing in Photoshop

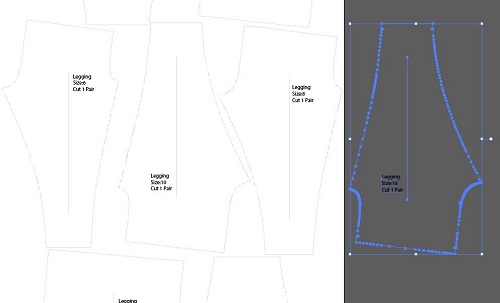
Open the PDF file in Illustrator. You can purchase our digital leggings pattern on our website or use your own.

Copy and paste the size you would like to use within the same file, we have selected size 10.

Photoshop_design_pattern_fabric_printing_leggings

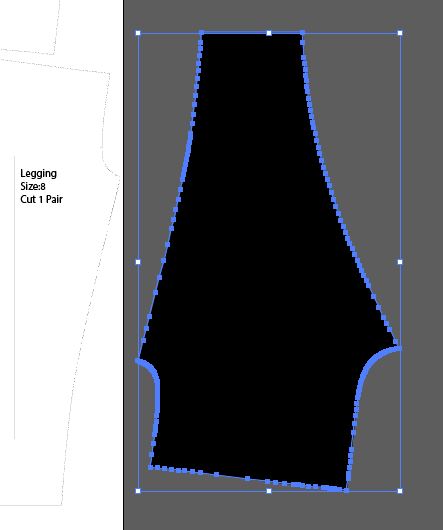
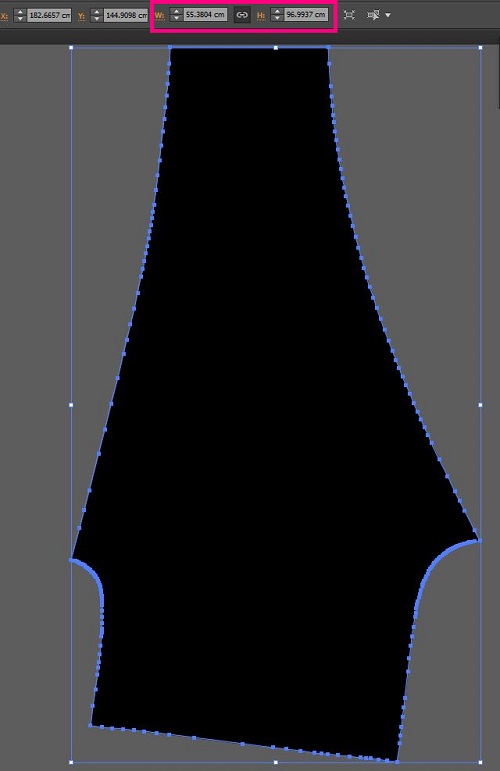
Delete all details and notches within the pattern piece and select the pattern shape and fill in black.

fashion_legging_design_digitalfabrics_printing

while legging is selected copy and take note on the sizing.

selection_legging_size_prints_fabric_lycra

Open Photoshop and select a new artboard, keep the pixels and resolution the same, just make sure you’ve selected RGB color mode. Click OK and Paste pattern piece as a smart object, click enter to place.

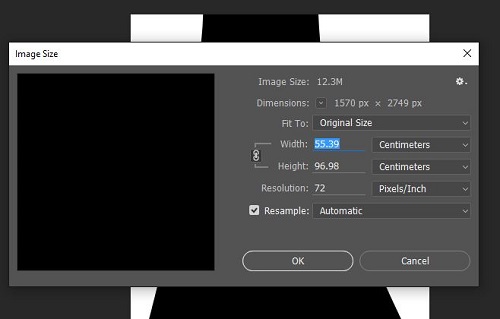
Double check that the sizing is correct by selecting Image>image size, in this case it is only a few points off which will be fine.

Design_tutorial_fashion_legging_black

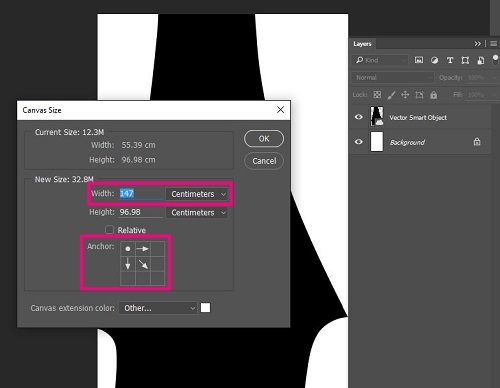
Next you’ll need to increase your artboard size to fit the other leg, change the width of your artboard to the width of the fabric you’d like to use and select the anchor points to extend from corner.

tutorial_design_fabric_digitalfabrics_legging

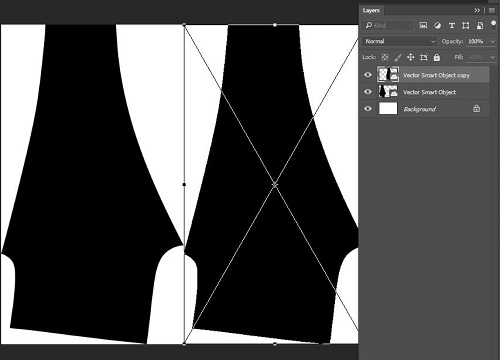
Copy Layer and while selected transform (Ctrl+t), while still selected right click on top of the layer and select Flip Horizontally, you know have a pair.

fabric_printing_tutorial_design

photoshop_tutorial_legging_fabric

With both layers selected you will need to select transform again (ctrl+t) and while select cover over to rotate, when rotating make sure you hold down shift to make sure it rotates correctly.

Right_photoshop_design_legging_tutorial

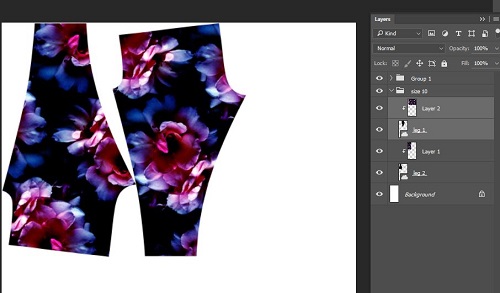
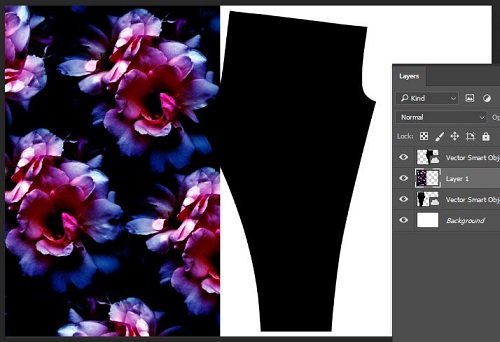
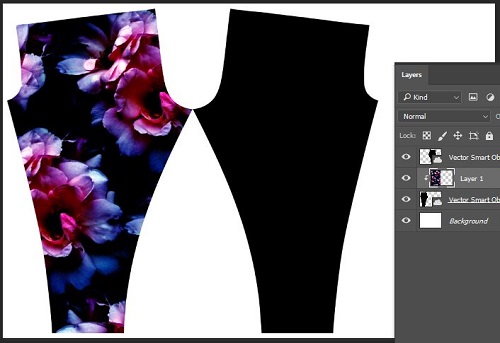
Copy and paste the design you would like on your leggings and place layer on top of the one of the pattern legs.

pattern_legging_fashion_design_printing

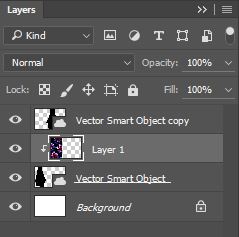
Right click on the design layer and in the drop down menu select create clipping mask.

layers_photoshop_design_fabric

clipping_mask_design_legging_luxe_sports

Repeat for other leg

Group all layers and centre.

Your file is now ready to print!

leggings_sportsluxe_fintess_sport_fit_fashion

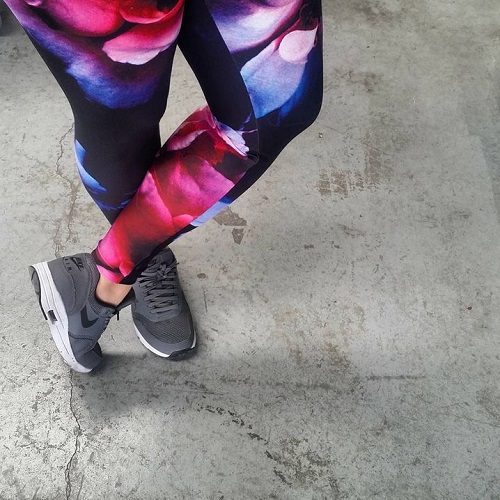
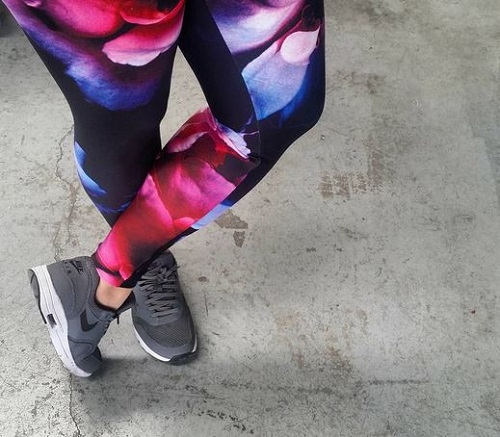
Soon you’ll have your printed fabric which you’ll be able to whip up into these comfy leggings

legging_sports_luxe_design_fasion_rose_print


Save

How to prepare a layout legging pattern for fabric printing in Photoshop

Garment making and production can be daunting and a complicated process especially placement or engineered printing. A lot of time and effort goes into research and understanding where to start. We have put together tutorials on how to design, work with and prepare legging pattern for digital placement fabric printing. For this tutorial  you need to be proficient in Illustrator or at least have basic knowlage. Our tutorial is based on industry standards. This technic can be applied to printing other products such as bikinis, t-shirts, singlets , dresses etc.

How to prepare a layout/mark up legging pattern for fabric printing in Photoshop

Once you’ve completed the steps in the tutorial ‘How to use legging pattern in Photoshop’ You may want to print more than 1 design or more than 1 size, the most economic way to do this is to create a mark up/placement layout to have printed.

The following are instructions on how to set up in Photoshop, but could easily be done in Illustrator.

Start off by renaming the pattern layers to insure that you always have a pair of leggings.

layer_photoshop_markup_design_fabric_legging_printing

If you are only wanting the same size with different designs you can just Duplicate the leg layers. If you’d like to bring in different sizes you will need to repeat the steps in ‘How to use legging pattern in Photoshop’

In this tutorial we will be using the same size 10 but printing in new designs.

On the same artboard move files to the left hand side. you will notice that you can only comfortable fit 1 pair within the 147cm width with the current orientation; however there is a lot of wastage as illustrator below.

legging_layout_printing_fabric_design

Like a Jigsaw puzzle you will now need to start moving the patterns, you will need to make sure that you keep in mind that your grain line is parallel to the selvage. To do this, select the leg you’d like to rotate (select both layers) press Ctrl+t to open up the transform tool and while holding down shift rotate the image 360′ and make sure to move the pattern piece as close as possible to other leg (zoom in to make sure it is not overlapping)

tutorial_layout_markup_printing

markup_fashion_layout_tutorial_leggings_bold_rose

You can now start bringing in the other size 10 designs and play around with the layout. It’s best that you make the art board slightly longer than needed and once you’ve set up all the designs crop the excess.

Make sure you zoom in and double check that you haven’t overlapped any areas, when you are happy with the layout save as a JPG, TIFF or PDF.

layout_legging_tutorial_polish_abstract_orchid_black_white_bold_rose_floral_sports_luxe

You’re now on your way to have custom printed fabric which you will be able to make into comfy leggings.
design-your-own-leggings-digital-fabrics-class create-your-own-activewear-design-leggings-digital-fabrics-classes

Save

Save

Design your own leggings – How to prepare legging pattern for fabric printing in Photoshop

Garment making and production can be daunting and a complicated process especially placement or engineered printing. A lot of time and effort goes into research and understanding where to start. We have put together tutorials on how to design, work with and prepare legging pattern for digital placement fabric printing. For this tutorial  you need to be proficient in Photoshop and Illustrator or at least have basic knowlage. Our tutorial is based on industry standards. This technic can be applied to printing other products such as bikinis, t-shirts, singlets , dresses etc.

How to prepare legging pattern for fabric printing in Photoshop

Open the PDF file in Illustrator. You can purchase our digital leggings pattern on our website or use your own.

Copy and paste the size you would like to use within the same file, we have selected size 10.

Photoshop_design_pattern_fabric_printing_leggings

Delete all details and notches within the pattern piece and select the pattern shape and fill in black.

fashion_legging_design_digitalfabrics_printing

while legging is selected copy and take note on the sizing.

selection_legging_size_prints_fabric_lycra

Open Photoshop and select a new artboard, keep the pixels and resolution the same, just make sure you’ve selected RGB color mode. Click OK and Paste pattern piece as a smart object, click enter to place.

Double check that the sizing is correct by selecting Image>image size, in this case it is only a few points off which will be fine.

Design_tutorial_fashion_legging_black

Next you’ll need to increase your artboard size to fit the other leg, change the width of your artboard to the width of the fabric you’d like to use and select the anchor points to extend from corner.

tutorial_design_fabric_digitalfabrics_legging

Copy Layer and while selected transform (Ctrl+t), while still selected right click on top of the layer and select Flip Horizontally, you know have a pair.

fabric_printing_tutorial_design

photoshop_tutorial_legging_fabric

With both layers selected you will need to select transform again (ctrl+t) and while select cover over to rotate, when rotating make sure you hold down shift to make sure it rotates correctly.

Right_photoshop_design_legging_tutorial

Copy and paste the design you would like on your leggings and place layer on top of the one of the pattern legs.

pattern_legging_fashion_design_printing

Right click on the design layer and in the drop down menu select create clipping mask.

layers_photoshop_design_fabric

clipping_mask_design_legging_luxe_sports

Repeat for other leg

Group all layers and centre.

Your file is now ready to print!

leggings_sportsluxe_fintess_sport_fit_fashion

Soon you’ll have your printed fabric which you’ll be able to whip up into these comfy leggings

legging_sports_luxe_design_fasion_rose_print


Save

DIY Bean Bag | DIY with Digital Fabrics

DIY Bean Bag
Elba from Live Colorful created another colorful & creative DIY tutorial: a DIY Bean Bag. For this she used the Cheery fabric she designed and which is available in our fabric shopDid you know that printing fabrics with us is super easy? Create your design, Upload and pay, Receive your fabric!

From DIY clothes to DIY Home Decor, our mission at Digital Fabrics is to help you to bring your creativity and your amazing ideas to life!

Elba got the inspiration for her DIY project from Pinterest, but added some fun curves to make it look more organic.


MATERIALS NEEDED:

  1. 2 meters of heavyweight fabric. Waratah drill (147 cm wide). Design: Cheery.
  2. 2 packs of bean bag chair refill (100 Liter refill bags)
  3. Sewing machine
  4. Thread
  5. Scissors
  6. Pins

DIY Bean Bag

DIY Maxi Dress| DIY with Digital Fabrics

DIY Maxi Dress with Digital Fabrics
A maxi dress is a wardrobe staple that every woman needs. It’s feminine, easy to wear and DIY.

Ovoke shows us how you can DIY a maxi dress with Digital Fabrics. Our mission at Digital Fabrics is to help you to bring your creativity our amazing ideas to life! Shop this and more fabrics in our Fabric Shop

Designing Fabric: How To Make A Repeat Pattern – Mirror Repeat Tutorial in Photoshop

Mirror repeat technic is one of the easiest way to make a repeat pattern with any digital image, photographs, graphic artwork or painting. Mirror repeat creates an interesting effect, simple and quick, doesn’t require great Photoshop skills. To design your own fabric you can either use our Photoshop tutorial or Fabric Uploader with an instant Mirror repeat option.

Mirror Repeat Tutorial in Photoshop

Open your artwork in Photoshop, make any adjustments to the dimensions (width/height) at this stage.

Double click (press OK) the background layer in your layers panel so it is no longer locked.

First tutorial screenshot

Increase your artboard size, go to Menu > Image > Canvas Size > double the width of the canvas size making sure to click the left arrow so the increase only happens to one side.

second tutorial screenshot

Now duplicate the original layer by clicking and dragging it to the second from the right icon at the base of the layers panel.

third tutorial screenshot

With the duplicated layer selected go to Menu>Edit>Transform>Flip Horizontally>OK. Drag the flipped layer across (holding down SHIFT key) so the layer slots into place in line with the original layer. Make sure to zoom into mirroed join beetwin the images to double check that no pixels are out. Merge layers by sellecting them both, right click and choose Merger Layers option.

fourth tutorial screenshot

Repeat this step again, but mirroring the length/height of the image. When you transform the duplicated layer, make sure to flip VERTICALLY before dragging into place.

fifth tutorial screenshot

Flatten the layers, right click on one of the layers, select Flatten Image option. This is now your mirrored repeat tile that repeats
seamlessly on all four sides! Now you can use your design for digital custom fabric printing.

sixth tutorial screenshot

final tutorial screenshot

Save

Save

Save

Save

Colours To Inspire: Purple & Orange

purple and orange fabric digital fabrics
Purple & orange is not an obvious colour combo but the mix of the deep purple and warm orange makes for a beautiful colour contrast. Purple promotes peace of mind, harmony of emotions and contributes to stability while orange radiates warmth and happiness.

purple and orange fabric digital fabrics
You can find the colours purple and orange in our Tribal Sunset fabric. If want you fabric colours to be perfect, no problems. We offer colour matching services. We can either colour match to provided Pantone colour or physical swatch.

Find more color inspiration on the Digital Fabrics Pinterest page